
To complete a checklist on my phone, I check the assigned inspection, record each result, and confirm that it reaches the office. I do not consider the job finished just because I have tapped “Send.”
I follow these 3 steps:
- Before starting: I review the customer, location, equipment, and form. I check permissions and, if the app supports it, prepare the inspection for working without coverage.
- During the visit: I answer each item, complete the required fields, and add notes, photos, and measures to correct any faults. If I cannot check something, I make a note of it.
- When finished: I review the data and attachments, send the same record, and confirm synchronization and receipt without creating duplicates.
My rule is simple: saving is not sending and <u>sending does not mean approval</u>. The checklist is linked to the digital work report templates so the supervisor can review the results.
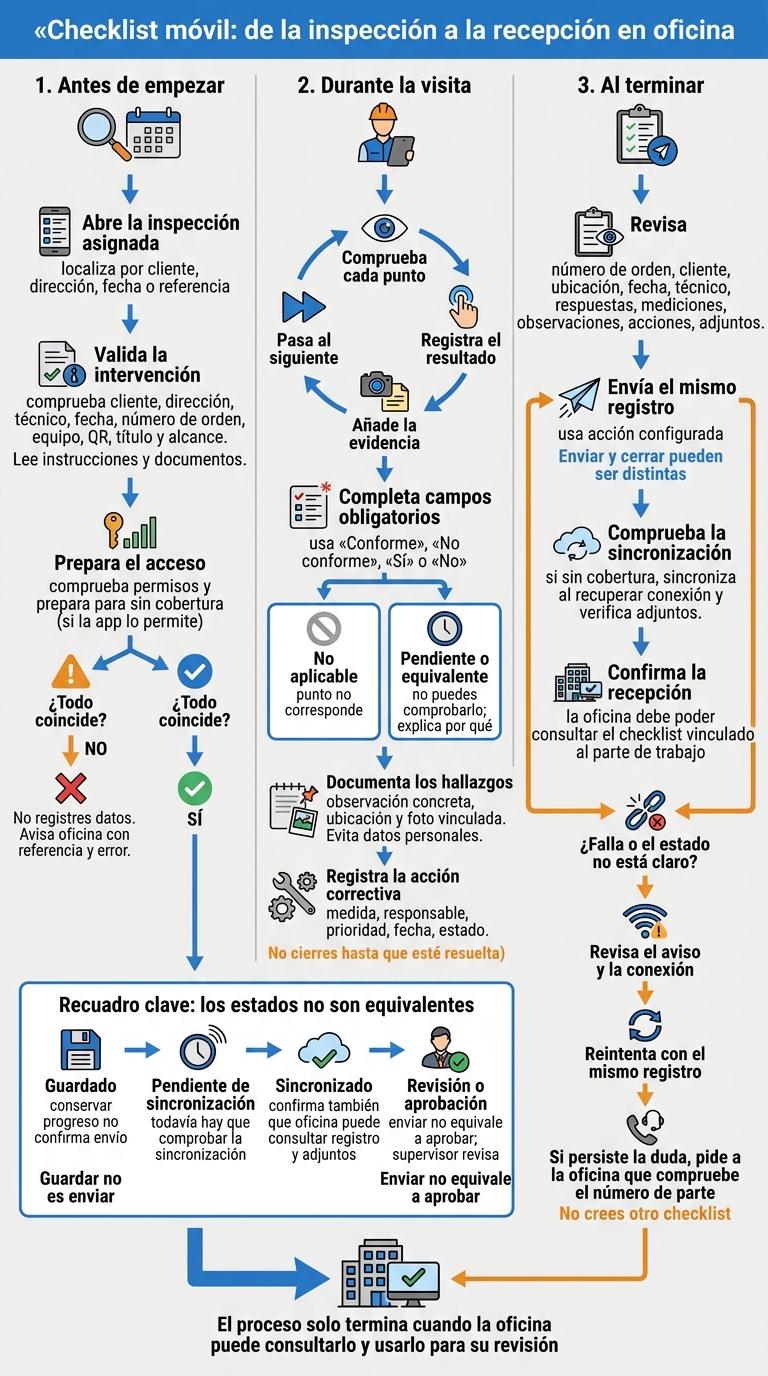
Mobile checklist: from inspection to receipt at the office
Open the assigned inspection
With access and connectivity ready, search for the visit by customer, address, date, or reference and open the relevant work order. The work order defines the intervention, and the checklist records the inspection. The menu path depends on the app.[2][4]
Confirm the customer, site, and checklist
Before completing the form, confirm the customer, address, technician, and date. Check the reference in the assigned work orders. If there are several visits, identify the correct one by its work order number and task description.[1][3]
Next, check that the form matches the intervention. Review the equipment ID or QR code, if available, and verify that the checklist title and scope match the inspection and preventive maintenance service. Also read the instructions and attached documentation before answering.
If anything does not match, do not record any data or use another work order. Notify the office and provide the reference and the error found before continuing.
sbb-itb-b01fb3c
Complete the checklist as you inspect
With the inspection open and verified, complete the checklist as you work through the equipment. Check each item, record the result, and add evidence before moving to the next. Follow the form’s sequence to avoid mixing up equipment, forgetting readings, or leaving issues unrecorded.
Answer the questions and complete the required fields
Select the form options and complete the required fields when performing each check. Use Not applicable if the item does not apply. If you cannot inspect it, select Pending or the equivalent option and explain why. Do not choose a random answer just to proceed; consult work report examples if you are unsure about the expected standard.
Support each answer with a measurement, photo, or note where appropriate.
| Field type | How to complete it |
|---|---|
| Configured option | Select the specified result: Compliant, Non-compliant, Yes, or No. |
| Text | Describe specific facts and indicate where you observed them. |
| Numeric measurement | Enter the reading with the requested precision and unit: 18.5 °C. If the unit is already displayed, enter only the value. |
| Date | Follow the specified format: 02/11/2026. |
| Time | Record the time of the check in 24-hour format: 09:30. |
| Photo | Attach the evidence to the relevant item, if permitted. |
| Signature | Request it from the customer or technician when required by the form. |
If you interrupt the inspection, save your progress only if the app supports it. Saving a draft does not confirm submission. Before moving to another area, review pending items and correct any required fields that are incomplete or contain errors.
Add observations, photos, and corrective actions
The result classifies what you found. The observation explains what you saw, where it is, and what remains to be done. Record each finding separately and link photos to its question. If necessary, include an overview photo and a close-up. Avoid including faces, documents, or personal data.
The corrective action indicates what will happen next. Complete the configured fields: measure, person responsible, priority, date, and status. This information is part of the checklist linked to the digital work report that the office receives for review upon submission.
If you resolve the issue during the visit, record what you did and add final evidence where appropriate. Do not close the action until it is resolved.
Review and send the checklist
Once you have completed the checklist, review it before sending.
Check the data, attachments, and submission status
Check the work order or report number, customer, location, date, and technician. Also review the required answers, measurements, observations, corrective actions, and attachments.
Use the submission action configured in the app. If sending and closing the work order are separate actions, choose the appropriate one.
Review the record’s status: saved, pending synchronization, and synchronized do not mean the same thing. If you are working without coverage, synchronize when connectivity returns and check that the attachments have uploaded.
If submission fails, review the notification and connection before retrying with the same record. If the status is still unclear, ask the office to check the report number. Do not create another checklist.
Hypothetical example: air conditioning maintenance
Hypothetical example: air conditioning maintenance. The technician finds a damaged filter, attaches a photo with a recommendation to replace it, and sends the checklist linked to the digital work report. The office then receives the report with the evidence and can review it without repeating the inspection.
itcons.app brings together text, dates, times, materials, photos, signatures, lists, and location in digital work reports.
Conclusion: confirm that the checklist has reached the office
When the status changes to synchronized, check that the office has received the checklist correctly. The process ends only when the office can access it and use it for review.
Start with a recurring inspection linked to a digital work report. Define the required fields and evidence. After several visits, review errors, the time taken until receipt, and issues identified before closure with the office. Use that information to adjust the customizable forms and templates.
FAQs
Can I correct a checklist after sending it?
It depends on your company’s workflow. Once sent, the checklist is no longer pending completion and usually moves to review or validation at the office.
If you need to correct it, contact the administrative manager. They can manage the change or return it to editing status if the workflow allows it.
Review all fields before tapping the send button.
What should I do if the customer refuses to sign?
If the customer refuses to sign the checklist or work report, record this in the observations before sending it. Clearly explain what happened so the office team is informed.
The process depends on the configuration defined by the administrator in itcons.app. If a signature is mandatory, ask your manager how to close the record in accordance with your company’s internal procedures.
How do I avoid losing photos if synchronization is interrupted?
Before finalizing the checklist, check that photos, other attachments, and signatures have been saved correctly in the form.
If you are working offline or with unstable coverage, synchronize the app when coverage returns. Even if synchronization is automatic, check that the record’s status has changed after submission. This confirms that the information has reached the office.


